How to Take the Perfect Source Photo for AI Headshots
The quality of your AI headshot depends heavily on your source photo. Here is exactly what to do to get the best possible result.
The single biggest factor in how good your AI headshots turn out isn't the tool you use — it's the source photo you feed it. Learning how to take the best photo for an AI headshot is the difference between a result that looks like a professional studio portrait and one that lands squarely in the uncanny valley. AI headshot generators are powerful, but they follow the oldest rule in computing: garbage in, garbage out. Give the AI a dark, blurry, badly-angled selfie and even the best generator struggles; give it a clean, well-lit photo and the results can be genuinely stunning.
The good news is you don't need a photographer or fancy gear. A modern phone camera, a window, and a few minutes of attention to lighting and angle are all it takes to capture a source photo that produces excellent AI headshots. In this guide, we'll cover exactly what makes a great source photo — lighting, angle, background, expression, and variety — plus the specific mistakes that quietly ruin results, so your DIY professional headshot photo gives the AI everything it needs to shine.
Lighting: The Most Important Factor
If you get only one thing right, make it lighting. It matters more than your camera, your outfit, or your pose combined.
Soft, even light is the goal. The best and cheapest source is natural window light on an overcast day, or a window with sheer curtains diffusing direct sun. This wraps your face in soft, flattering light with no harsh shadows — exactly what the AI needs to read your features accurately.
Face the light, don't let it come from behind. Position yourself facing the window so the light falls evenly on your face. Backlighting (a window behind you) throws your face into shadow and confuses the AI about your actual features.
Avoid harsh overhead light. Ceiling lights and midday sun directly overhead cast shadows in your eye sockets and under your nose — the dreaded "raccoon eyes." If you're stuck with overhead light, hold a white sheet of paper or use a reflector below your face to bounce light back up.
Watch for color casts. A room lit by a warm orange bulb or a cool blue screen tints your skin unnaturally, and the AI may bake that tint into your headshots. Neutral, white-ish light is safest.
Even lighting beats dramatic lighting for AI. You might love moody, high-contrast portraits, but AI generators do best with clear, evenly-lit source photos where every feature is visible. Save the drama for the output styles — give the AI clean input.
Angle, Framing, and Background
With lighting handled, the next tier of factors is how you frame the shot.
Shoot at eye level. Hold the camera at the same height as your eyes, not below (which creates an unflattering up-the-nose angle) or too far above. Eye level reads as natural and professional and gives the AI an honest view of your face.
Face the camera fairly straight on. A slight angle is fine, but a mostly front-facing photo gives the AI the clearest information about your facial structure. Extreme profiles or heavily turned heads reduce likeness accuracy.
Frame head and shoulders. A headshot is about your face, so frame from roughly mid-chest up. Make sure your entire head, including the top of your hair, is in the frame and not cropped.
Keep the background plain and uncluttered. A simple, neutral wall behind you helps the AI cleanly separate you from the background. You don't need a perfect studio backdrop — the generator will replace it — but a plain background produces a cleaner starting point than a busy, cluttered one.
Fill the frame appropriately. Don't stand so far back that your face is tiny, and don't crowd the lens so close that features distort. A comfortable head-and-shoulders distance is ideal.
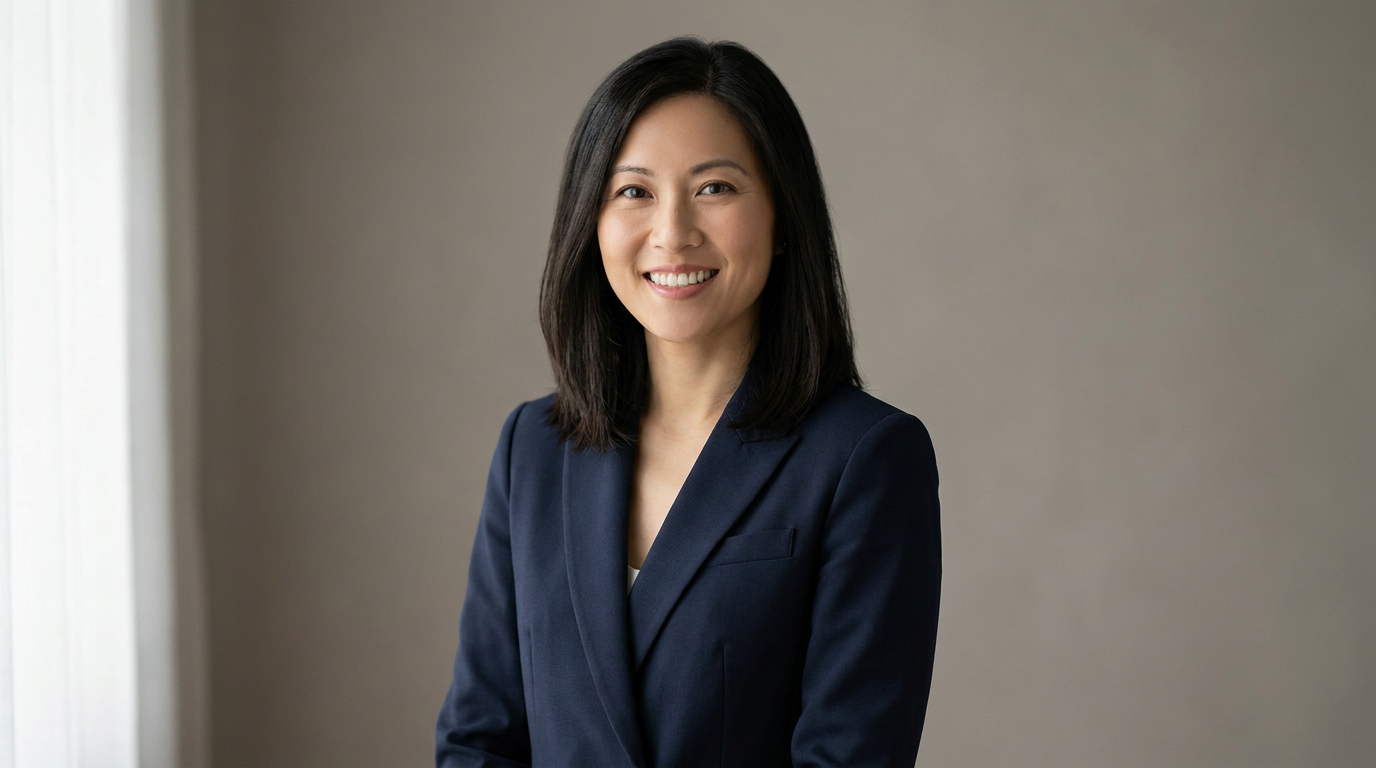
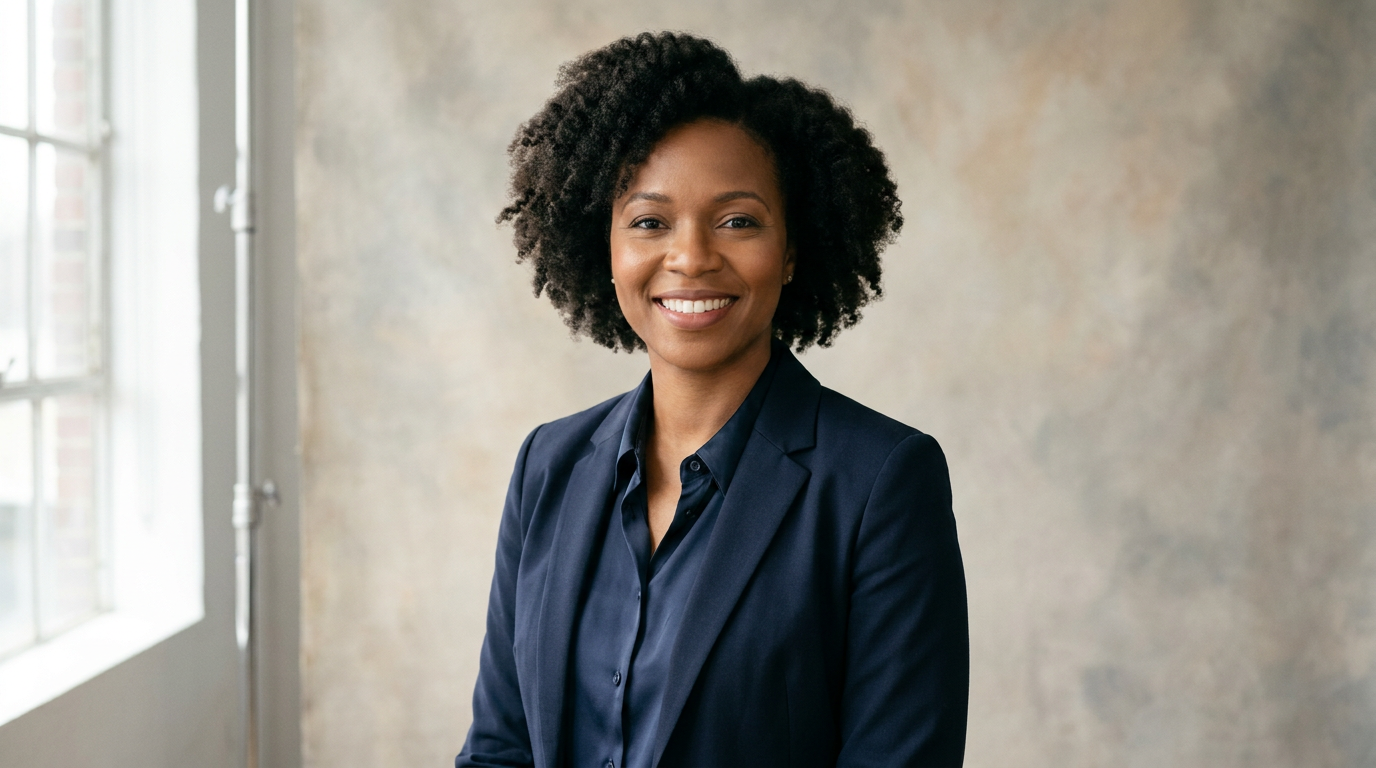
Get the angle, framing, and background right, and you've handed the AI a clean, readable canvas — which is exactly what it needs to generate a headshot that looks like a real professional photo of you.
Step-by-Step: Capture the Perfect Source Photo
Here's the exact routine to shoot a source photo (or set of photos) that produces great AI headshots.
Step 1: Find your light. Stand facing a large window during daytime, ideally with soft or overcast light. If the sun is harsh, diffuse it with a sheer curtain.
Step 2: Set a plain background behind you. Position yourself so a simple, uncluttered wall is behind you. Neutral colors work best.
Step 3: Set up your camera at eye level. Use a phone stand, prop it on books, or have someone hold it at the height of your eyes. Use the rear (higher-quality) camera if someone can take the shot.
Step 4: Frame head and shoulders. Position yourself so you're captured from mid-chest up, with your whole head in frame and a little space above your hair.
Step 5: Relax your expression. Aim for a natural, approachable look — a soft closed-mouth smile or a genuine slight smile. Avoid a stiff, forced expression.
Step 6: Take several shots with variety. Capture multiple photos: a few straight-on, a few at slight angles, with a couple of different expressions. This variety helps the AI learn your face and improves likeness.
Step 7: Review and pick the best. Choose the sharpest, best-lit, most natural-looking shots. Delete any that are blurry, shadowed, or awkwardly angled.
Step 8: Upload to JPT AI. Go to sjpt.io, open the AI Headshot Generator, and upload your best source photos. New users get free trials, so you can generate and evaluate your headshots at no cost.
Pro Tips for Standout Source Photos
These extra touches push your results from good to genuinely professional.
Wear what you want to appear in. While AI can restyle outfits, starting in simple, professional clothing that fits your industry gives the most reliable results. Solid colors beat busy patterns.
Clean your camera lens. A smudged phone lens softens every shot. Wipe it before you start — a five-second fix that noticeably improves sharpness.
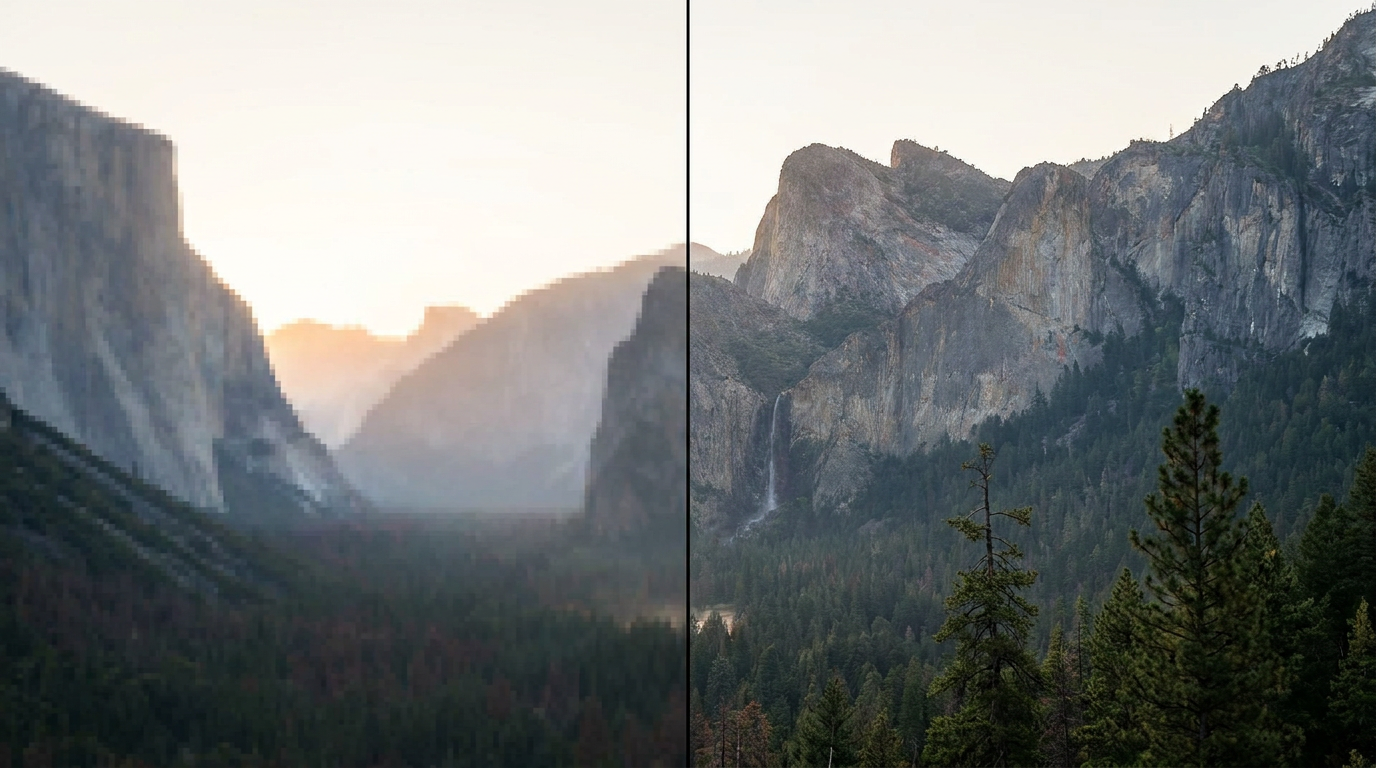
Shoot at your phone's highest resolution. More detail gives the AI more to work with. Turn off any beauty filters or effects; you want an honest, high-detail capture.
Do a hair and grooming check. Since the AI preserves your features, tidy hair and grooming in the source photo carry through to the output. Flyaways and stray hairs can muddy edge detection.
Capture on a neutral-expression baseline plus a smile. Providing both a neutral and a smiling shot gives you flexibility in which vibe your final headshots project.
Take more than you think you need. Shoot 10-15 frames and pick the best 3-5. It costs nothing and dramatically raises your odds of a standout source photo. When in doubt about a shot's quality, leave it out — a few excellent photos beat many mediocre ones.
Common Mistakes to Avoid
These are the source-photo errors that quietly wreck AI headshot results.
Poor or uneven lighting. The number one culprit. Dark photos, harsh overhead shadows, or strong color casts give the AI bad information and produce disappointing headshots. Prioritize soft, even, front-facing light.
Shooting from below. The up-the-nose angle is unflattering and distorts your proportions. Always shoot at eye level.
Using heavily filtered or edited photos. Beauty filters, skin smoothing, and effects alter your real features, so the AI generates a version of the altered you. Start with an honest, unfiltered photo.
Low-resolution or blurry input. A soft, tiny, or motion-blurred photo can't produce a crisp headshot. Use a sharp, high-resolution capture.
Providing no variety. A single photo, or many nearly-identical ones, gives the AI a narrow view of your face. Include different angles and expressions.
Home Photo vs. Studio Photo for AI Input
You might wonder whether you really need a professional photo to start with. Here's the honest comparison.
A good home photo is entirely sufficient. The whole point of AI headshot generators is to produce a professional-looking result from an ordinary source photo. You do not need a studio shot to begin with — a well-lit window photo taken on your phone gives the AI everything it needs. Spending money on a professional source photo somewhat defeats the purpose.
What matters is meeting the fundamentals, not the setting. A home photo that nails lighting, eye-level angle, plain background, and a natural expression will outperform a studio photo that got those wrong. The location is irrelevant; the fundamentals are everything.
Where a studio helps is only if you skip the fundamentals. A professional photographer will get lighting and angle right by default. But you can replicate that with a window and a little attention, for free.
The practical bottom line: invest your effort, not your money. Spend five minutes getting the lighting and angle right at home, and the AI does the rest. That's the entire value proposition — turning an accessible home photo into a polished professional headshot without a photographer. JPT AI's free trials let you prove this to yourself before spending anything.
Who Benefits from Getting the Source Photo Right
Everyone using an AI headshot generator benefits, but some especially so. Job seekers on a budget can produce a genuinely professional LinkedIn and resume photo from a home shot, competing with candidates who paid for studio sessions. Remote workers who need a polished profile but can't easily get to a photographer do it from their living room.
Founders and freelancers building a personal brand generate consistent, professional imagery on demand. Entire teams photographed in different locations can each capture a good home source photo and end up with matching, cohesive headshots. Anyone facing a deadline — a last-minute conference bio, a sudden job application — can shoot and generate a headshot in under an hour.
The unifying benefit is independence: once you know how to take a great source photo, you never again need to schedule and pay for a headshot session. A window, a phone, and JPT AI's free trials are all it takes.
Frequently Asked Questions
What's the best photo to use for an AI headshot?A clear, high-resolution, front-facing photo taken at eye level with soft, even lighting (natural window light is ideal), a plain background, and a natural expression. Providing several such photos with slight variety improves results.
Can I take a good AI headshot photo at home?Absolutely. A home photo by a window on your phone, with attention to lighting and eye-level angle, is all the AI needs. You don't need a studio or professional gear.
How many photos should I upload?It depends on the tool, but providing several good, varied photos (different angles and a couple of expressions) helps the AI capture your likeness accurately. Quality and variety matter more than sheer quantity.
What lighting is best for an AI headshot source photo?Soft, even, front-facing light — natural window light on an overcast day, or diffused daylight. Avoid harsh overhead light, backlighting, and strong color casts.
Should I smile in my source photo?A natural, relaxed expression works best — a soft closed-mouth smile or genuine slight smile. Providing both a neutral and a smiling shot gives you flexibility in the final look.
Do filters or beauty modes help?No — turn them off. Filters alter your real features, so the AI generates a version of the filtered you rather than the real you. Use an honest, unedited capture.
Does the background of my source photo matter?A plain, uncluttered background helps the AI separate you cleanly, but it doesn't need to be perfect since the generator replaces it. Just avoid busy, distracting backgrounds.
Can I use an old photo I already have?Yes, if it meets the fundamentals — well-lit, sharp, front-facing, eye-level, and natural. If your existing photos are dark, blurry, or heavily filtered, it's worth taking a fresh one.
Key Takeaways
Great AI headshots start with a great source photo, and the fundamentals are simple: soft even lighting (window light is your best friend), eye-level angle, plain background, natural expression, and a little variety across a few shots. Nail these and even a phone photo taken in your living room gives the AI everything it needs to produce a studio-quality result. You don't need a photographer or expensive gear — you need five minutes and a window.
Avoid the common traps of harsh lighting, shooting from below, heavy filters, and low resolution, and your results will look genuinely professional. Once your source photo is ready, head to sjpt.io and try the AI Headshot Generator — new users get free trials, so you can see your polished headshots at zero cost.