Image Resolution Explained for Beginners (DPI, PPI, Pixels and More)
Image resolution is one of the most misunderstood concepts in digital photography. This guide explains everything you need to know in plain English.
Image resolution explained simply: it's the amount of detail an image holds, measured in pixels — and understanding it is the difference between a crisp, professional photo and a blurry, pixelated mess. If you've ever been confused by terms like DPI vs PPI, wondered what 'megapixels' actually means, or been baffled by why your photo looks great on screen but terrible when printed, you're in exactly the right place. This beginner's guide breaks down everything about image resolution in plain English — no jargon, no math degree required.
By the end, you'll understand what resolution really is, the crucial difference between pixels and resolution, when DPI matters and when it doesn't, and how to make sure your images are the right resolution for any purpose — web, print, social media, or large-format posters. We'll also cover what to do when an image is too low-resolution (spoiler: AI upscaling can rescue it) and the common resolution mistakes that trip up beginners. Whether you're a small business owner preparing product photos, a designer prepping files for print, or just someone tired of blurry uploads, this guide will make image resolution finally click. Let's demystify it, one pixel at a time.
What Is Image Resolution, Really?
Let's start with the foundation, because most confusion comes from mixing up a few related concepts.
Pixels are the building blocks. Every digital image is a grid of tiny colored squares called pixels (short for 'picture elements'). Zoom in far enough on any photo and you'll see them. Each pixel holds one color. Put millions together and your eye blends them into a smooth image.
Resolution is the pixel count. When we say an image is '1920 x 1080,' we mean it's 1920 pixels wide and 1080 pixels tall — that's about 2 million pixels total. A '4000 x 3000' image has 12 million pixels (12 megapixels). More pixels means more detail, which means the image can be displayed or printed larger while staying sharp.
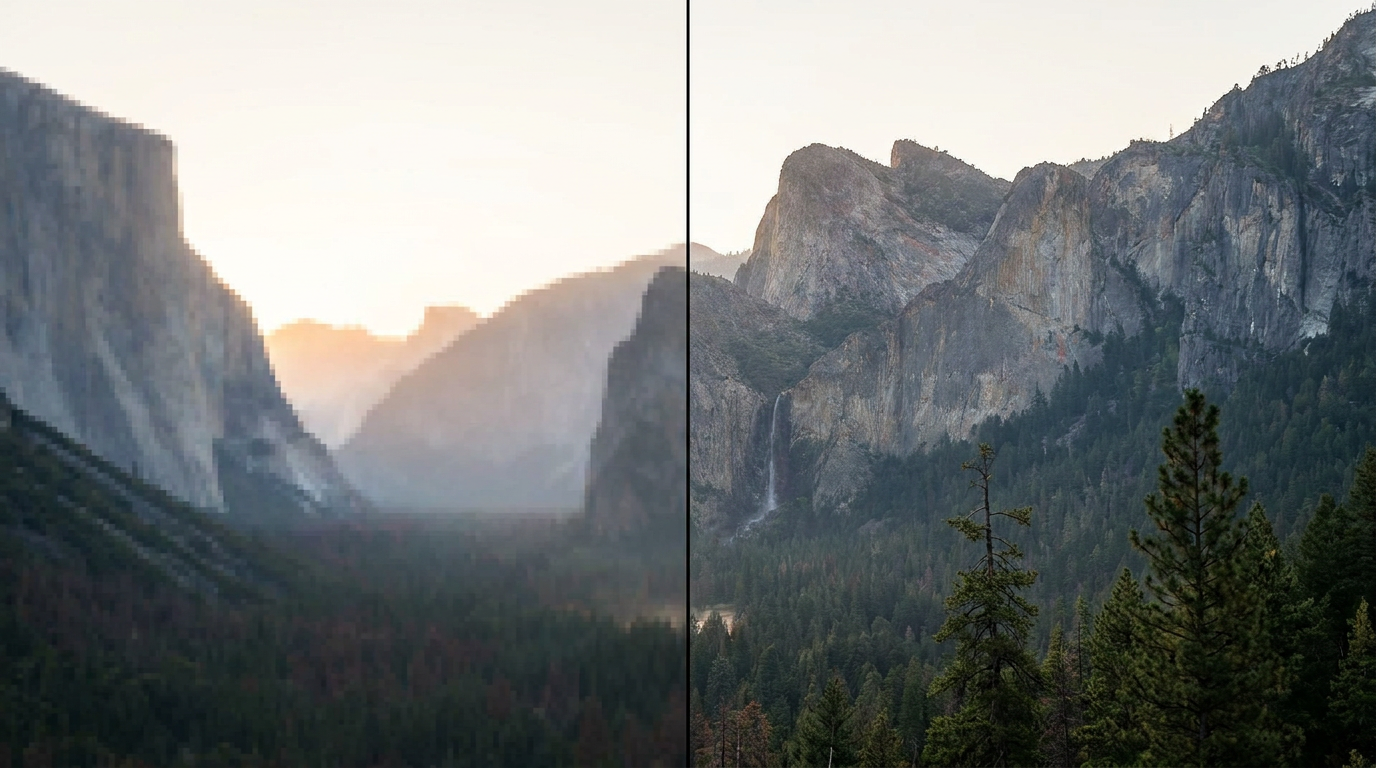
Why it matters: A low-resolution image (few pixels) looks fine small but breaks down — going blurry and blocky — when enlarged, because there simply isn't enough detail to fill the larger space. A high-resolution image has detail to spare.
The simple takeaway: Think of pixels as the ink and resolution as how much ink you have. A little ink covers a postage stamp beautifully but can't fill a billboard. This is why the same photo can look perfect as a phone thumbnail and awful as a printed poster — it's the same pixels stretched over more space.
DPI vs PPI vs Pixels: Clearing Up the Confusion
These three terms cause more confusion than anything else in imaging. Here's the plain-English breakdown.
PPI (Pixels Per Inch) measures how densely pixels are packed when an image is displayed or printed. It describes the relationship between your pixel count and physical size. A 300 PPI image packs 300 pixels into every inch — dense and detailed. A 72 PPI image spreads pixels thin.
DPI (Dots Per Inch) technically refers to printer dots of ink, not image pixels. In everyday use, people say 'DPI' when they mean PPI, and for practical purposes you can treat them as the same concept: how much detail per inch. The key figure to remember: 300 DPI/PPI is the standard for quality printing, while screens only need around 72 PPI.
Pixels are the raw count — the actual number of picture elements, independent of physical size.
Here's the crucial insight beginners miss: For screens and web, DPI/PPI is essentially meaningless — what matters is the raw pixel dimensions. A 1000 x 1000 pixel image looks identical on screen whether it's tagged 72 or 300 DPI. DPI only matters for printing, where it determines how large you can print before the image looks soft.
Quick rule: Working for web or social? Ignore DPI and focus on pixel dimensions. Printing something? Aim for 300 DPI at your final print size. To find the pixels you need for print, multiply: print size in inches x 300. An 8x10 inch print at 300 DPI needs 2400 x 3000 pixels.
Step-by-Step: How to Check and Fix Your Image Resolution
Here's exactly how to find your image's resolution and fix it if it's too low.
Step 1 — Check your current pixel dimensions. On Windows, right-click the image, choose Properties, then Details — you'll see width and height in pixels. On Mac, right-click, Get Info. This tells you your raw resolution.
Step 2 — Determine what you need. For web/social, match the platform's recommended pixel size (e.g., Instagram posts are 1080 x 1080). For print, multiply your print size by 300 (an 8x10 needs ~2400 x 3000 pixels).
Step 3 — Compare. If your image already has enough pixels for your purpose, you're done — just resize down if needed (shrinking never loses quality). If it has too few pixels, you need to add resolution.
Step 4 — Understand the limitation. Traditional resizing can't truly add detail — stretching a small image just makes bigger, blurrier pixels. This is where AI comes in.
Step 5 — Upscale with AI. Go to sjpt.io and open the AI Upscaler. Upload your low-resolution image. Unlike basic stretching, AI upscaling intelligently generates new detail, reconstructing edges and textures to increase resolution while staying sharp.
Step 6 — Choose your upscale level. JPT AI's Normal upscale is free and unlimited — perfect for most needs. For maximum detail on important images, Pro AI upscale delivers the highest quality.
Step 7 — Download and verify. Save the upscaled image and re-check its pixel dimensions. You now have a higher-resolution file ready for larger display or print.
Step 8 — Set DPI for print if needed. If you're printing, set the file to 300 DPI at your target size in your print software or export settings.
Pro Tips for Working with Resolution
Tip 1 — Always start with the highest resolution you can. Shoot at your camera's maximum quality and keep original files. You can always shrink an image without quality loss, but enlarging is far harder.
Tip 2 — Shrink, don't stretch, when possible. Reducing an image's size keeps it crisp. Enlarging beyond the original pixel count is where quality suffers — so capture big and scale down.
Tip 3 — Ignore DPI for anything screen-based. For web, social, and apps, only pixel dimensions matter. Don't waste time changing DPI settings for digital use.
Tip 4 — Use 300 DPI as your print gold standard. For sharp prints, ensure your image has enough pixels for 300 DPI at the final print size. Below ~150 DPI, prints start looking soft.
Tip 5 — Upscale low-res images with AI before enlarging. If you must make a small image bigger, run it through an AI upscaler first — it adds detail intelligently instead of just blurring.
Tip 6 — Match resolution to purpose to save space. A giant 24-megapixel image is overkill for a web thumbnail and just slows page loads. Right-size your exports for each use.
Common Mistakes to Avoid
Mistake 1 — Confusing DPI with pixel dimensions for web. Changing an image to '300 DPI' does nothing for screen display — only pixel count matters online. Beginners waste time on this constantly.
Mistake 2 — Stretching small images and expecting sharpness. Enlarging a low-res photo in basic software just produces bigger blurry pixels. Use AI upscaling to actually add detail.
Mistake 3 — Printing low-resolution images. A photo that looks fine on screen can print blurry if it lacks the pixels for 300 DPI at print size. Always check before sending to print.
Mistake 4 — Saving everything at maximum resolution. Uploading a 24-megapixel image where a 1080-pixel version would do bloats file sizes and slows websites. Right-size for the purpose.
Mistake 5 — Repeatedly saving JPGs. Every JPG save recompresses and loses quality. Keep a master copy in a lossless format (like PNG) and export JPGs from that when needed.
Resolution Requirements by Use Case
Different purposes demand different resolutions. Here's a practical reference.
Social media: Instagram posts are 1080 x 1080 pixels; Stories and Reels are 1080 x 1920; a Facebook cover is around 820 x 312. Match the platform's spec — these are pixel dimensions, and DPI is irrelevant here.
Websites: Full-width hero images are typically 1920 x 1080 or larger; content images 800 to 1200 pixels wide. Balance quality against file size for fast loading.
Standard prints: A 4x6 photo at 300 DPI needs 1200 x 1800 pixels; an 8x10 needs 2400 x 3000; an A4 document around 2480 x 3508. Always aim for 300 DPI at final size.
Large-format (posters, banners): These can use lower DPI (100 to 150) because they're viewed from a distance — but they still need substantial pixel counts. A 24x36 poster at 150 DPI needs 3600 x 5400 pixels.
Product photos for marketplaces: Amazon recommends at least 1600 pixels on the longest side to enable zoom; 2000+ is better.
The universal principle: figure out the final display or print size, then ensure you have enough pixels. If you fall short, AI upscaling with JPT AI can bridge the gap — its free Normal upscale handles most everyday resolution shortfalls without costing anything.
Real-World Scenarios: When Resolution Matters Most
A small business owner designed a beautiful logo but only had a tiny 200-pixel version from years ago. When she tried to print it on banners, it turned into a blurry blob. Running it through an AI upscaler reconstructed the detail and gave her a crisp, print-ready file — saving a costly redesign.
An Etsy seller uploaded product photos that looked fine on her phone but were too small for the marketplace's zoom feature, hurting buyer confidence. Upscaling them to 2000+ pixels enabled zoom and made her listings look professional.
A marketing coordinator received a low-res headshot from a new hire and needed it for a printed brochure at 300 DPI. Instead of scheduling a new shoot, she upscaled the existing image to print quality in seconds.
A history buff wanted to print an old, low-resolution family photo as a large framed gift. AI upscaling added the detail needed to enlarge it beautifully. In every case, understanding resolution — and knowing AI could rescue low-res files — turned a frustrating limitation into an easy fix.
Frequently Asked Questions
What's the difference between DPI and PPI?PPI (pixels per inch) measures pixel density in a digital image; DPI (dots per inch) technically refers to printer ink dots. In everyday use they're used interchangeably to mean detail per inch. For quality printing, aim for 300 of either.
Does DPI matter for images on websites?No. For screens, only pixel dimensions matter. A 1000 x 1000 image looks identical whether tagged 72 or 300 DPI. DPI only matters for printing.
What resolution do I need for printing?300 DPI at your final print size. Multiply print dimensions in inches by 300 — an 8x10 print needs about 2400 x 3000 pixels.
Can I increase the resolution of a low-quality image?Yes, with AI upscaling. Unlike basic stretching (which just blurs), AI intelligently generates new detail. JPT AI's Normal upscale is free and unlimited.
What does 'megapixels' mean?One megapixel is one million pixels. A 12-megapixel camera captures images with about 12 million pixels — more megapixels means more detail and larger possible print sizes.
Why does my photo look sharp on screen but blurry when printed?Screens need far fewer pixels than prints. An image with enough pixels for a screen may lack the detail for 300 DPI printing, so it appears soft when printed larger.
Is a higher resolution always better?Not always. Higher resolution means larger files and slower websites. Match resolution to purpose — huge files are wasteful for web thumbnails.
Can I make an image smaller without losing quality?Yes. Shrinking an image (reducing pixels) keeps it crisp. Only enlarging beyond the original pixel count risks quality loss.
Key Takeaways
Image resolution comes down to one simple idea: pixels are detail, and more detail means you can display or print larger while staying sharp. Remember the essentials — resolution is your pixel count, DPI only matters for printing (aim for 300), and for screens only pixel dimensions count. Always start with the highest-quality original you can, shrink rather than stretch, and match resolution to your purpose.
When an image is too low-resolution for what you need, you're no longer stuck — AI upscaling can intelligently add detail and rescue files that traditional resizing would ruin.
Have a low-res image that needs more detail? Try JPT AI's AI Upscaler at sjpt.io — the Normal upscale is completely free and unlimited, no sign-in required. Turn your blurry, too-small images into crisp, high-resolution files in seconds.