How to Put a White Background on a Photo for Free
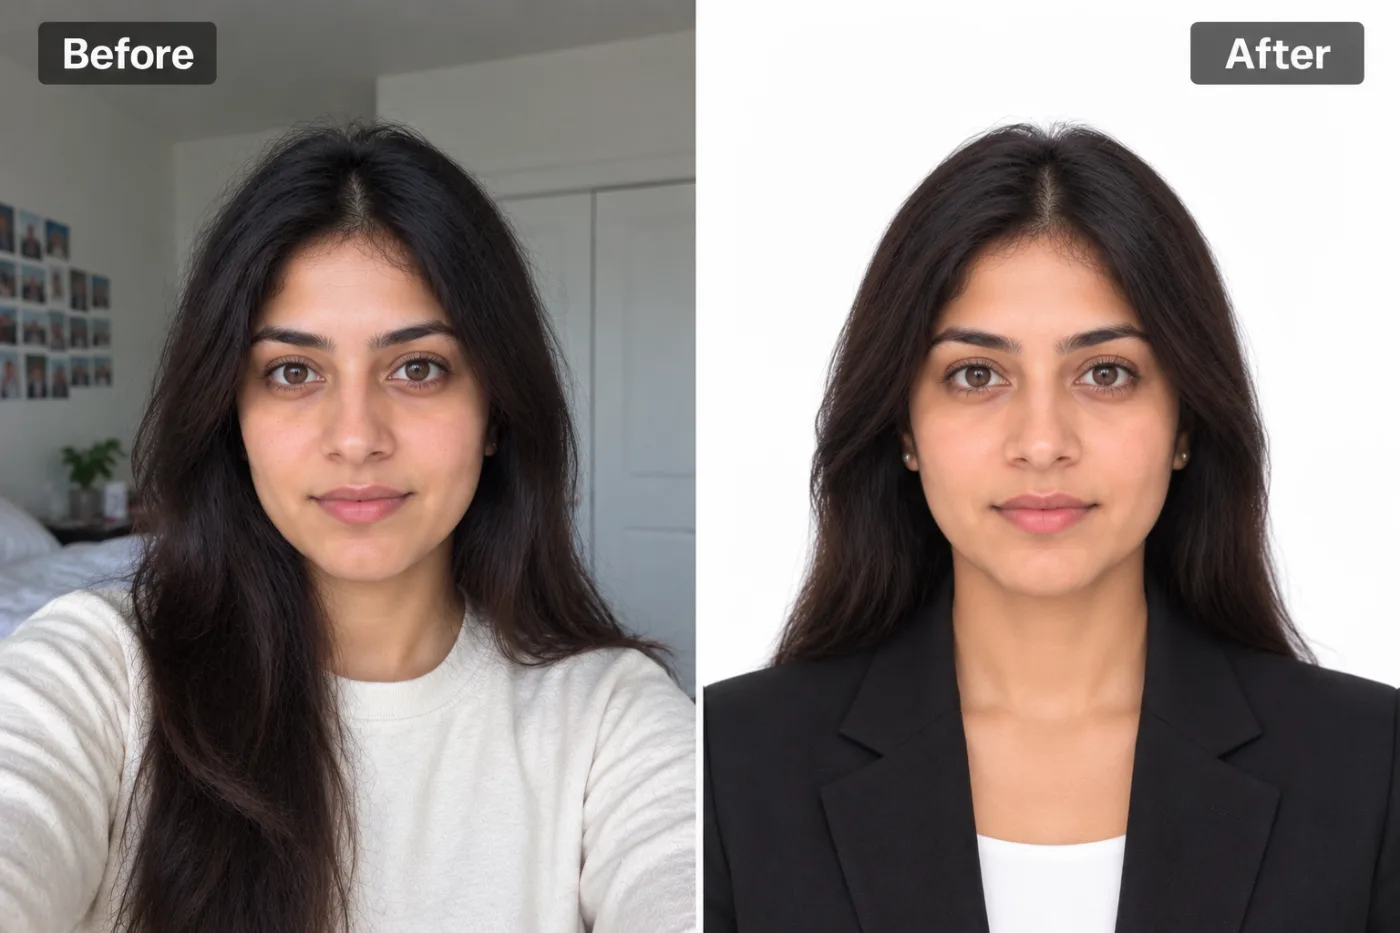
Clean white backgrounds look professional for products, portraits, and IDs. Here's how to add one to any photo for free.
Knowing how to put a white background on a photo for free is one of the most useful editing skills for anyone selling products, applying for jobs, or just wanting clean, professional-looking images. A crisp white background makes your subject pop, meets the requirements of marketplaces like Amazon and eBay, and gives portraits, product shots, and ID photos a polished, studio-quality feel. Best of all, you don't need Photoshop, a lightbox, or a photography studio to do it.
The challenge is that most photos are taken in messy real-world settings — a cluttered desk, a busy room, an uneven wall. Simply pasting a white rectangle behind your subject leaves ragged edges and looks obviously fake. The proper method is to cleanly remove the original background first, then replace it with pure white. In this guide, you'll learn how to add a white background to any photo in seconds using free AI, the pro tips that keep edges sharp, the mistakes that make white backgrounds look flat or fake, and where a clean white background is genuinely required versus just nice to have.
Why Getting a Clean White Background Is Tricky
It sounds simple — put white behind the subject — but doing it well is harder than it looks. The first problem is isolating the subject cleanly. If you just drop a white layer behind a photo, the original background still shows around the edges. You have to remove the original background precisely first, and any leftover fringe or halo ruins the clean look.
The second problem is achieving true, pure white. Many platforms don't just want 'a light background' — they want specific values. Amazon, for instance, requires RGB 255, 255, 255 for main product images. A photo shot against a white wall almost never hits that; real-world white comes out slightly gray, cream, or blue-tinted depending on lighting and shadows. So even a 'white background' photo often fails compliance without editing.
Third, there's the edge quality on complex subjects — hair, fur, transparent packaging, thin straps. A clumsy cutout against white is brutally unforgiving, because pure white reveals every jagged edge and stray pixel. This is why a simple crop-and-paste rarely works. Getting a genuinely clean white background requires precise subject isolation plus an exact white fill — exactly the combination that AI background tools now automate in seconds, replacing what used to demand a lightbox setup or careful manual masking.
How Pixel Shine Adds a Perfect White Background
Pixel Shine's Background Remover handles both halves of the job automatically. First, the AI detects your subject and removes the original background cleanly in about five seconds — no manual masking. Then you drop in a solid white background, and because it's a generated fill rather than a photographed wall, it's perfectly uniform and can be set to true white with no shadows or color cast.
This two-step-in-one approach solves the problems that trip people up. You get precise edges because the AI isolates the subject accurately, so there's no leftover fringe showing against the white. You get true, even white across the whole background because it's a solid fill, not a real surface with lighting variation. And the tool handles tricky subjects — hair, product edges, transparent parts — far better than a manual crop.
The practical benefits make it ideal for volume work. At 2 credits a photo with no subscription, you can white-background an entire product catalog or a stack of ID photos. There's no watermark on downloads and no subscription — each cutout costs 2 credits. If your original photo is low-resolution or slightly soft, running it through the AI Upscaler first sharpens the subject so its edges look crisp against the unforgiving white — a detail that matters, since pure white exposes every flaw.
Step-by-Step: Put a White Background on a Photo
Here's how to get a clean white background in under a minute.
1. Choose a well-lit photo. Good lighting and a subject that contrasts with its surroundings give the cleanest cutout. If your image is soft or small, upscale it first.
2. Open the Pixel Shine Background Remover. Go to Pixel Shine and select the Remove Background tool. Sign in with a free account to begin.
3. Upload your image. Drag and drop or browse to select. JPG, PNG, and WEBP all work; higher resolution gives sharper edges against white.
4. Let the AI remove the original background. In about five seconds, your subject is isolated on a transparent canvas with the old background gone.
5. Select a white background. Choose the solid white fill option so your subject sits on a clean, even white — no shadows, no color cast.
6. Inspect the edges. Zoom in around the subject, especially on hair or thin details, to confirm there's no leftover fringe against the white.
7. Confirm it meets your requirement. For marketplaces needing pure white (255, 255, 255) or ID photos needing a specific standard, make sure the white is truly white.
8. Download in full resolution. Export your finished image, watermark-free, ready to upload to a listing, form, or portfolio.
Pro Tips for a Flawless White Background
These tricks keep your white-background photos looking professional.
- Shoot with your subject contrasting the original background. The cleaner the initial cutout, the better it looks against unforgiving white. Dark subjects on light surfaces (or vice versa) cut out best.
- Upscale before adding white for small or soft photos. Pure white magnifies every blurry edge. Sharpen the subject first with the AI Upscaler so it looks crisp.
- Use pure white for marketplaces, soft off-white for portraits. True 255-white is required for Amazon and ID photos, but a very subtle warm white can look softer and more flattering for personal portraits.
- Check the edges at 100% zoom. White is merciless — a faint gray halo invisible on a colored background will stand out sharply on white. Always inspect closely.
- Keep a transparent PNG master. Save one transparent version so you can switch between white, gray, or other backgrounds later without re-cutting the subject.
- Center and add margin for ID and product use. Many platforms want the subject centered with breathing room. Frame accordingly before you finalize.
Common Mistakes to Avoid
Avoid these errors that make white backgrounds look fake or fail requirements.
Pasting white behind the photo without removing the original background. This leaves the old background visible around the edges. You must isolate the subject first, then add white.
Settling for off-white when pure white is required. Amazon and many ID photo standards demand exact white (255, 255, 255). A cream or gray-ish 'white' can get a listing or application rejected. Set true white.
Ignoring edge fringe. A faint colored halo is nearly invisible on a busy background but glaring against white. Zoom in and check before downloading.
Using a blurry, low-res original. White dramatically exposes soft, pixelated edges. Upscale the image first so the subject looks sharp.
Forgetting framing rules. ID and passport photos have strict positioning and margin requirements; product photos often need the item to fill a set percentage of the frame. A clean white background won't help if the composition is wrong.
When You Actually Need a White Background
White backgrounds range from required to simply preferred, depending on the use.
E-commerce product listings on Amazon, eBay, and Walmart often mandate a pure white background for main images. Getting this right is the difference between a live listing and a suppressed one.
ID, passport, and visa photos typically require a plain white or light background with the subject centered — a strict, non-negotiable standard.
Professional headshots and resumes look cleaner and more focused on a white or near-white background, helping you present a polished, distraction-free image.
Catalogs and print materials use white backgrounds to keep products consistent and let designers place items cleanly on any page layout.
Team and staff photos on company websites look uniform and professional when everyone's headshot shares the same clean white background, even if the originals were shot separately.
AI White Background vs. Lightbox and Photoshop
How does free AI compare to the traditional ways of getting a white background? A physical lightbox or studio setup — a white sweep, softboxes, and careful lighting — can produce a clean white background in-camera, but it costs money, takes space, and requires photography skill. Even then, you often still need editing to hit pure 255-white, because real light creates subtle shadows and gradients.
Photoshop lets you cut out the subject and fill white manually with total control, but it demands a subscription and the skill to mask complex edges like hair. For a batch of product photos, the time cost is significant.
Basic phone apps can add white backgrounds but frequently watermark the output, cap resolution, or produce rough edges that show against the white.
AI removal collapses the whole workflow into seconds. It isolates the subject precisely, fills perfect uniform white, handles difficult edges automatically, and outputs a full-resolution, watermark-free image in seconds. You skip the lightbox, the subscription, and the manual masking entirely. For anyone who needs clean white backgrounds regularly — sellers, HR teams, applicants — AI is the fastest and most cost-effective path to studio-quality results.
Who Needs White-Background Photos and Why
Online sellers need pure white backgrounds to comply with marketplace rules, keep listings from being suppressed, and present products consistently to boost buyer trust.
Job seekers and applicants use white backgrounds for clean resume headshots and for passport, visa, and ID photos that meet official standards.
HR and recruiting teams standardize staff headshots onto a uniform white background so the company's About page and directory look cohesive and professional.
Small business owners apply white backgrounds to product and team photos to look established and trustworthy without hiring a studio.
Photographers and designers deliver clients clean white-background versions for catalogs, print, and web. Across all these users, the goal is a distraction-free, professional image that meets requirements and puts the subject front and center.
Frequently Asked Questions
How do I put a white background on a photo for free?Upload your photo to the Background Remover at Pixel Shine, let the AI remove the original background in about five seconds, then choose the solid white background option and download with no watermark. Each photo costs 2 credits.
Can I get pure white (255, 255, 255) for Amazon?Yes. Because the white is a solid generated fill rather than a photographed wall, it can be set to true white that meets Amazon's main image requirement, then downloaded ready to upload.
Will the edges look clean against white?They will if you start with a sharp, high-resolution photo. Pure white exposes soft edges, so upscale a blurry image first and zoom in to check for any fringe before downloading.
Does it work for passport and ID photos?Yes, you can produce a plain white background for ID and passport photos. Just confirm your image also meets the specific positioning, sizing, and margin rules of the issuing authority.
What if my photo has hair or fuzzy edges?The AI is built to handle soft edges like hair, preserving strands while removing the background. For the cleanest result against white, use a well-lit, high-resolution photo with good contrast.
Can I switch to a different background color later?Yes. Save a transparent PNG master, and you can swap between white, gray, or any color afterward without re-cutting the subject each time.
Is there a limit on how many photos I can do?At 2 credits a photo with no subscription, you can white-background an entire catalog or a batch of headshots without a retoucher.
Do I need Photoshop or a lightbox?No. The AI replaces both — it isolates your subject and fills perfect white automatically, so you don't need studio equipment, a subscription, or editing skills.
Key Takeaways
Putting a white background on a photo for free is simple with AI: it removes the original background and fills clean, even white in about five seconds — no lightbox, no Photoshop, no skills required. For the best results, start with a sharp, well-lit, high-contrast photo, upscale soft images first, use true 255-white where marketplaces or ID standards require it, and always check the edges at full zoom since white hides nothing.
Ready for clean, professional white-background photos? Visit Pixel Shine, upload your image to the Background Remover, and download a crisp white-background photo in seconds — no watermark, no subscription.